In this article, I present an extremely effective technique to erase the presence of the photographer or any other element in a 360° photograph. Indeed, all the directions being captured, they all appear in the final image and, unlike standard photography, the photographer is therefore necessarily present in the image. If the photographer does not want to appear and cannot hide, the solution will be based on an “erasure” to be applied to the digital image.
THE APPROACH
The principle used here to delete one or more mobile elements is to carry out several image captures then to carry out a fusion by stacking the images with a photo editor.
The quality of the stacking will be all the more precise as the captured images will be as identical as possible, consequently, the shots must be taken on a tripod.
The typical use case for this technique applied to 360 is the erasure of the photographer. Nevertheless, you can apply it to any subject, rather small, and mobile between the images (birds, passer-by, car, ….).
The approach will be particularly effective in removing passers-by from an urban image, and this is, moreover, my most common use case.
As for the photo editing software, I use the excellent Affinity Photo which has a stacking function. Of course, you can use the software of your choice provided that it allows you to merge a stack of images.
THE 2-STEP CLEANING PROCESS
The cleaning procedure is very simple: loading the images then stacking.
Step 1: Load the images and stack them
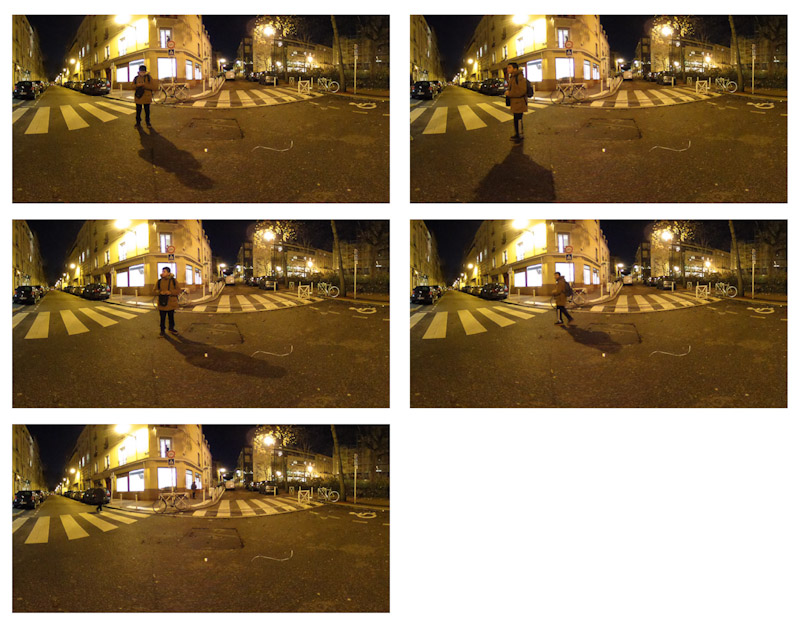
I load the images into Affinity Photo indicating that they should be stacked. Since I made the capture using a tripod, there is no need to realign, the stack works very well like this.
In this example, a person moved during my capture sequence and therefore appears on several images. As it was in motion, it is each time in a different position which will promote its erasure during stacking.
We can act on the settings available on the stacking function to obtain the best result depending on the light conditions.
Step 2: Merge the stack
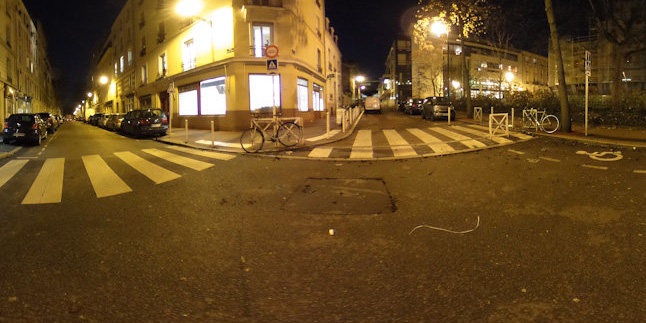
Finally, the fusion is carried out and finalized on a single layer.
As we see in the result of this example, the result is quite spectacular since the passerby and his shadow have completely disappeared from the final image.
So that this approach allows not to see the photographer, it will be necessary that the latter is in motion during the capture of the sequence. If it is approximately at each photo in a different place, then as for the passer-by of the example, it will not appear in the photo result resulting from the stacking.
CONCLUSION
We have seen in this article how to erase moving parts of a 360 ° photo. The approach is particularly useful for digitally hiding the photographer who is struggling to be able to hide behind his camera. This technique is very effective because, with a few instructions to be observed when shooting, it is completely automatic in post-processing.