360 cameras are designed to capture all directions. To allow you to see the 360 degrees that surround the camera, these are equipped with several lenses/sensors that “look” in all directions. Some only have two very wide-angle lenses, others have several dozen sensors, each confined to a portion of the 360° sphere. Regardless of the number of lenses selected, these are necessarily prominent on the camera, which makes them very sensitive to the slightest shock or fall of the camera. If you ask 360 capture enthusiasts, no doubt you will find several who have already encountered this problem. An unfortunate gesture, a gust of wind, a slip… in short, there is no shortage of shock patterns on your camera.
There are a few tricks that can reduce the risks – I could mention them in a future article, however, the risk cannot be completely ruled out.
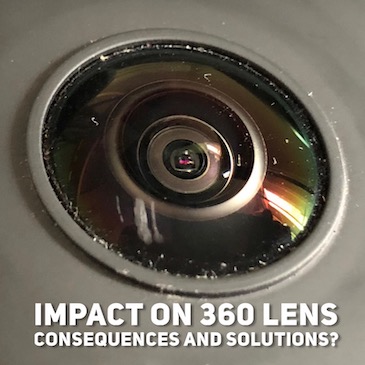
IN CASE OF SHOCK… WHAT ARE THE CONSEQUENCES?
Depending on the shock, the impact on the camera can be more or less destructive; this can range from complete breakage of the lens to a simple trace of impact. On my first 360 camera, it was totally inoperative in the sense that it didn’t even start up anymore, and a fortiori didn’t allow you to capture new images or transfer the images already present. In this case, the loss is total since in the space of an instant, we go from being the happy owner of a 360 camera to the unfortunate owner of a kind of “zombie” camera that can no longer fulfill its role.
With newer cameras my experience leads me to believe that the materials used are stronger, and furthermore the use of risk reduction techniques also reduce the force of the shock thus making the shocks less destructive than the example previous. Nevertheless, whatever the shock, I always observed an impact on one of the lenses, and even if it seems reduced, the consequences on the image are unfortunately still visible.
EXAMPLE 1: ONE-TIME IMPACT (INSTA360 ONE X)
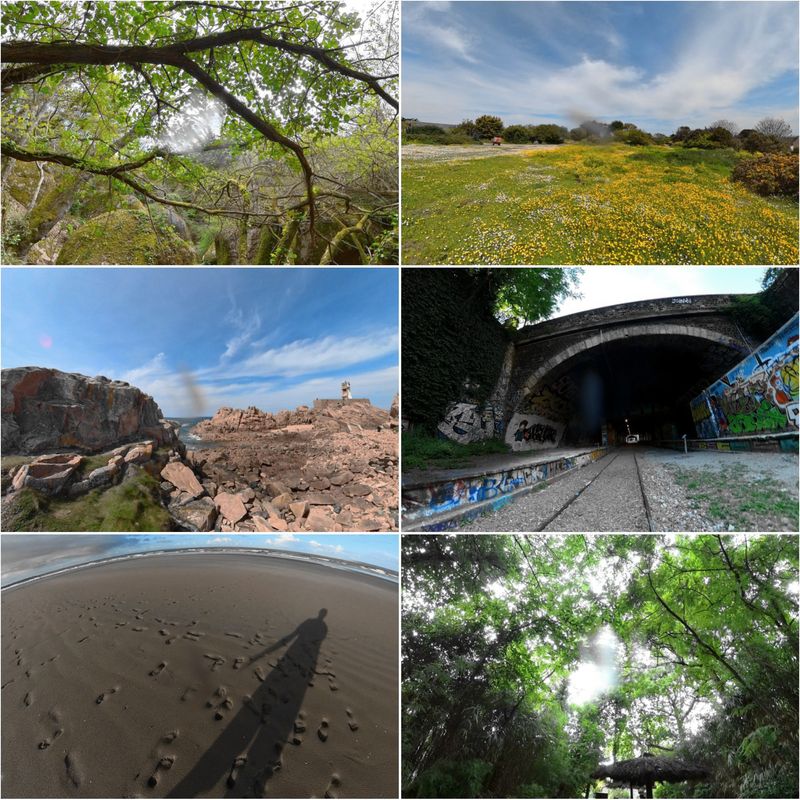
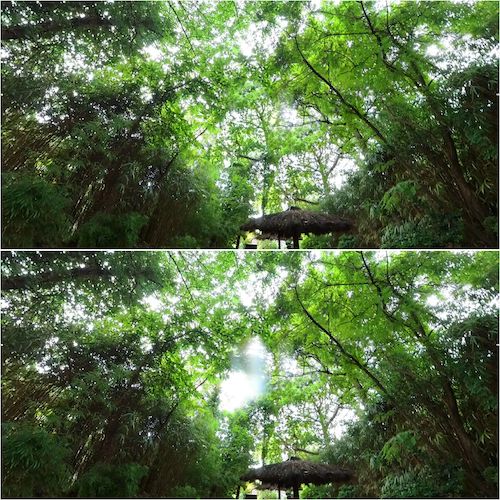
With my ONE X, I didn’t have the bad experience of a brutal shock or an unfortunate fall, it was much simpler. I was doing a sporty walk in the rocks on the coast of Brittany, at one point, I just put the pole with the ONE X mounted on it. In the space of a second, the pole rolled a few cm on itself, one of the lenses of the ONE X simply touched the rocks. This was enough for me to notice a temporary impact, admittedly very weak but nevertheless clearly visible on the images.
Depending on the subjects, blue sky or more complex subject, and the light conditions, the impact zone is more or less visible on the images captured.


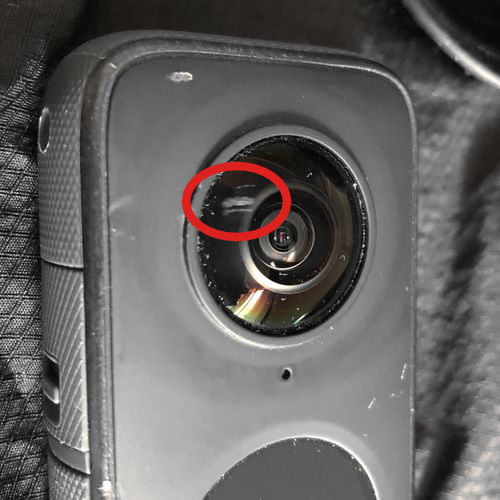
EXAMPLE 2: LINE IMPACT (INSTA360 ONE X2)
Still in Brittany, a few years later, my ONE X2 camera was fixed on a stabilized pole with a weight on a mini tripod. Despite these precautions, all it took was a fairly strong gust of wind to cause the assembly to topple over. Here, the shock was more brutal. Although the camera fell from a height of 1.5m, and hit the ground quite hard, the damage was fairly measured. Nevertheless, the contact area is clearly visible on the images, and is particularly troublesome for uniform areas.
WHAT SOLUTIONS TO CORRECT THE IMAGE? WHAT TO DO WITH YOUR CAMERA?
A first idea is to arrange so that the impact is not on the most interesting areas of the image. Of course, this is not ideal…one of the advantages of 360 cameras is precisely not to worry about the orientation of its orientation and to do the framing later. This benefit is partially lost if you have to think about the impact zone.
Another idea, especially applicable to still images, is to correct the impact area with a smart brush. With Affinity Photo, you have the inpaint function, it replaces the area of your choice taking into account the surrounding areas. This works very well for homogeneous areas or on the contrary areas of random appearance (grass for example). The result is much less relevant as soon as geometric elements are present.
A more comprehensive approach is to use the topic deletion techniques that I have presented in several other articles. The principle is to capture several images with different orientations of the lenses, to register the images, then to directly apply the techniques described in these articles: double capture erasure or stack erasure. A major disadvantage is that the images must be captured from exactly the same position, even if a rotation of the camera on itself is necessary.
Finally, note that these different techniques can be combined with each other. The results will be more or less convincing depending on your images. In any case, this obviously requires more attention than with a new camera.
Under these conditions, it is tempting to move towards a more radical solution.
LENS REPLACEMENT
Repairing the camera by replacing the lenses is the ultimate solution since it allows you to recover an almost new camera. However, do not forget that there are costs and delays associated with the repair. The cost of repair should be put into perspective of the cost of replacing with a new camera.
I am currently in the process of repairing one of my cameras, I might tell you more about that a bit later.
Here, as we have just seen, solutions exist to keep your camera usable after an impact. Despite all this, of course, the best thing is to protect your equipment as much as possible and avoid this situation, this will allow you to focus exclusively on your images.